只羊的博客

记录游戏开发历程

策略游戏地图制作(二)-Terrain生成-下

1.高度图处理

1.1.高度图获取

高度图本质上是一个二维数组,或者一个灰度图,存储指定xy坐标下的高度信息。运行时对高度数据采样来得知一个vert应该应用的高度,从而生成地形。可以通过一些算法生成高度图(如噪声),但为还原真实地形地貌,此处直接使用真实地理高度图,后续添加对地图的编辑功能来做微调

首先,要获取到真实地图的高度图数据。可以从一些开源的地理信息网站得到,此处以 USGS为例,网址为:
https://earthexplorer.usgs.gov/

打开网页后,在地图上点选以选取范围,转到DataSets下选择要下载的对应项

    image    
图:USGS界面

点击result或直接转到results页面即获取到对应的地块信息,可以选择TIF、DEM格式,这里使用TIF,下载后得到灰度图

    image    
图:USGS界面

下载得到的高度图内容,分辨率3601x3601,大小30MB左右:

    image    
图:下载得到的高度图内容

1.2.高度图的序列化

得到高度图资源后,就可以考虑先对高度图进行预处理了。简要说一下处理高度图数据的思路:

-首先,3601x3601的数据规模太大了,我们构建地图时完全不需要这么大的数据量,所以需要对原数据进行压缩处理,压缩为指定分辨率的数据
-其次,压缩后得到的高度信息可以序列化到一个指定格式的二进制文件,在Runtime时加载这个二进制文件,解析后再应用到Terrain上生成地形(之后会测试地图流式加载的性能,再思考优化)

思路已有,那么就可以开始了

先进行高度图压缩,采用简单的双线性插值,原理如图。最终返回目的分辨率尺寸的高度数据:(其实在这里可以做进一步的压缩工作,如果我们追求的地图精度不需要太高,完全可以换成单通道-8bit纹理来存储数据,后续如优化有需要再做改动)

    image    
图:双线性插值的原理
1
2
3
4
5
6
7
8
9
10
11
12
13
14
15
16
17
18
19
20
21
22
23
24
25
26
27
28
private float[,] CompressHeightData(string heightMapPath) {
float[,] heights = ReadHeightMapData(heightMapPath);
float[,] compressedHeights = new float[compressResultSize, compressResultSize];
int srcWsidth = heights.GetLength(0);
int dstHeight = heights.GetLength(1);
// resample the size of height map
for (int i = 0; i < compressResultSize; i++) {
for (int j = 0; j < compressResultSize; j++) {
float sx = i * (float)(srcWsidth - 1) / compressResultSize;
float sy = j * (float)(dstHeight - 1) / compressResultSize;
int x0 = Mathf.FloorToInt(sx);
int x1 = Mathf.Min(x0 + 1, srcWsidth - 1);
int y0 = Mathf.FloorToInt(sy);
int y1 = Mathf.Min(y0 + 1, dstHeight - 1);
float q00 = heights[x0, y0];
float q01 = heights[x0, y1];
float q10 = heights[x1, y0];
float q11 = heights[x1, y1];
float rx0 = Mathf.Lerp(q00, q10, sx - x0);
float rx1 = Mathf.Lerp(q01, q11, sx - x0);
// caculate the height by the data given
float h = Mathf.Lerp(rx0, rx1, sy - y0);
float fixed_h = Mathf.Clamp(h, 0, 50);
compressedHeights[i, j] = fixed_h;
}
}
return compressedHeights;
}

到指定的高度图文件的加载路径,读取所有TIF文件,然后写入数据到序列化文件中,以下是关键部分的代码(考虑到代码量,其他部分代码/参数未放到下方,请读者自行添加)

1
2
3
4
5
6
7
8
9
10
11
12
13
14
15
16
17
18
19
20
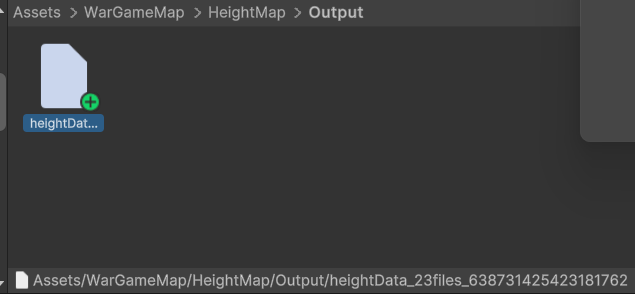
using (FileStream fs = new FileStream(outputFile, FileMode.CreateNew, FileAccess.Write)) {
using (BinaryWriter writer = new BinaryWriter(fs)) {
// file header : fileNum, single fileSize // Int32
writer.Write(inputFilePaths.Length);
writer.Write(size);
foreach (var inputFilePath in inputFilePaths) {
string fixedFilePath = AssetsUtility.GetInstance().FixFilePath(inputFilePath);
// get tif file info from the name, such as "n33_e110_1arc_v3"
string inputFileName = Path.GetFileName(fixedFilePath);

// get height data and write to file
float[,] heightMap = CompressHeightData(fixedFilePath);
for (int i = 0; i < size; i++) {
for (int j = 0; j < size; j++) {
writer.Write(heightMap[i, j]);
}
}
}
}
}

从USGS下载的TIF文件都遵循着:n{纬度}_e{经度}的命名格式。我们在序列化文件数据时,也按照这个格式读取TIF文件的经纬度信息写入文件当中,后续用作识别地块信息。以下是关键代码部分:

1
2
3
4
5
6
7
8
9
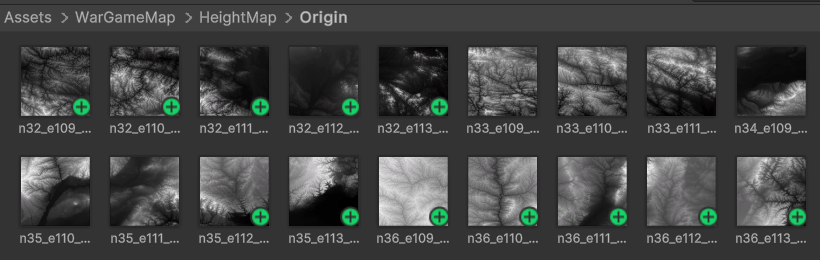
string[] heightMapPaths = Directory.GetFiles(heightMapInputPath, "*.tif", SearchOption.AllDirectories);
string inputFileName = Path.GetFileName(fixedFilePath);
// read the tif file, get longitude and latitude, write to this output file
Match matchLatitude = Regex.Match(tifFileInfo[0], @"^[a-zA-Z]+(\d+)$");
int latitude = int.Parse(matchLatitude.Groups[1].Value);
Match matchLongitude = Regex.Match(tifFileInfo[1], @"^[a-zA-Z]+(\d+)$");
int longitude = int.Parse(matchLongitude.Groups[1].Value);
writer.Write(latitude);
writer.Write(longitude);

最终执行上面的方法,你可以自己定义编辑器窗口使用序列化功能。也可以在Odin编辑器中写一个对应的处理窗口,这里结合之前的编辑器搭建工作,写了个高度图编辑器,界面如下(由于Odin布局代码并不好看,此处不放上编辑器类的源码):

    image    
图:高度图编辑器

点击上方的序列化高度图,在导出位置生成了序列化后的高度图文件:
(注:Odin部分的代码并不好看,此处仍然不放上,读者可自行通过Odin的API添加上导出与导入按钮的逻辑,上述的编辑器面板也仅是为了方便测试,重点在于序列化的逻辑)

    image     image    
图:序列化后的高度图文件

由于在序列化过程中进行了数据压缩,同时序列化后的文件剔除了TIF文件的多余信息,所以序列化后文件大小显著降低,从原来的十几个25MB的TIF文件压缩为一个23MB的文件,更适合用于存储高度数据。后续可以根据实际游戏开发需要,选取合适的分辨率进行生成

1.3.高度图的反序列化

上面的过程完成了高度图数据的预处理,现在我们已经可以在磁盘中读取到高度图文件。但高度信息最终还是需要加载进入内存,才能在Runtime中用于构建地形。

本节实现高度数据的反序列化

首先,为方便Runtime下的高度数据表示,我们需要先建立数据类用于存储高度图信息,该类中需要有的关键字段有:
-该高度数据对应的TIF文件(之前提到过从UGUS下载的文件都遵循n{纬度}_e{经度}的命名格式,所以记录 经纬度 数据即可)
-高度数据,float的列表(如对性能有要求,可压缩数据精度,改用更小的类型)
-高度数据大小,即size

以下是该数据类的字段部分代码:

1
2
3
4
5
6
7
[SerializeField]
public class HeightData {
public int longitude;
public int latitude;
public int size;
[SerializeField] List<float> heightDatas;
}

同样的,因为一个序列化后的文件对应多个TIF文件,也就是对应多个现实地理的地块,上面的一个HeightData仅对应一个地块,所以我们还需要在外层再添加一层数据组织类,用于管理HeightData,该类需要有以下字段:
-该数据类存储了多少个TIF文件数据
-单个TIF文件数据的大小
-HeightData的列表(因为该类用于管理HeightData)

以下是该类的字段部分代码:

1
2
3
4
5
public class HeightDataModel : ScriptableObject {
public int heightFileNums;
public int singleHeightFileSize;
[SerializeField] List<HeightData> heightDataList;
}

HeightDataModel继承了SO是为了直接存储在磁盘里,更方便在Unity Editor中使用,后续也可以在Runtime中加载这个SO。当然也可以直接加载之前的序列化文件获取高度数据,
不过在Editor下更麻烦些。最终我们建立起来的数据对应关系是一个HeightDataModel包含多个HeightData。
建立完Runtime下的高度数据模型后,开始写反序列化逻辑,关键代码如下:

1
2
3
4
5
6
7
8
9
10
11
12
13
14
15
16
17
18
19
20
21
22
23
24
25
26
27
28
29
using (FileStream fs = new FileStream(fileRelativePath, FileMode.Open, FileAccess.Read)) {
using (BinaryReader reader = new BinaryReader(fs)) {
int fileNum = reader.ReadInt32();
int singleFileWidth = reader.ReadInt32();
Debug.Log($"header info, num of files : {fileNum}, single file size : {singleFileWidth}");

HeightDataModel heightDataModel = ScriptableObject.CreateInstance<HeightDataModel>();
heightDataModel.InitHeightModel(fileNum, singleFileWidth);
DateTime dateTime = DateTime.Now;
string modelName = string.Format("HeightModel_{0}files_{1}.asset", fileNum, dateTime.Ticks);
heightDataModel.name = modelName;
for (int i = 0; i < fileNum; i++) {
int latitude = reader.ReadInt32();
int longitude = reader.ReadInt32();
float[,] heightDatas = new float[singleFileWidth, singleFileWidth];
// read the height data then add to the heightDataModel
for (int q = 0; q < singleFileWidth; q++) {
for(int p = 0; p < singleFileWidth; p++) {
heightDatas[q, p] = reader.ReadSingle();
}
}
Debug.Log($"now add a height data n{latitude}, e{longitude}, file width {singleFileWidth}");
heightDataModel.AddHeightData(longitude, latitude, singleFileWidth, heightDatas);
}
string assetFullPath = AssetsUtility.GetInstance().GetCombinedPath(deserlOutputFilePath, modelName);
AssetDatabase.CreateAsset(heightDataModel, assetFullPath);
AssetDatabase.SaveAssets();
}
}

为了填补上述代码的部分方法空缺,还需要在HeightDataModel与HeightData中添加如下代码逻辑:

在HeightDataModel中,添加初始化方法和加入HeightData类的方法:

1
2
3
4
5
6
7
8
9
public void InitHeightModel(int heightFileNums, int size) {
this.heightFileNums = heightFileNums;
this.singleHeightFileSize = size;
heightDataList = new List<HeightData>();
}
public void AddHeightData(int longitude, int latitude, int size, float[,] heightDatas) {
HeightData heightData = new HeightData(longitude, latitude, size, heightDatas);
heightDataList.Add(heightData);
}

HeightData中,传入float[]高度数据用于初始化,添加一个写入高度数据的方法:

1
2
3
4
5
6
7
8
9
10
11
12
13
14
15
16
17
18
19
20
21
22
23
24
public HeightData(int longitude, int latitude, int size, float[,] heightDatas) {
this.longitude = longitude;
this.latitude = latitude;
this.size = size;
this.heightDatas = new List<float>(size * size);
for (int i = 0; i < size; i++) {
for (int j = 0; j < size; j++) {
SetHeight(i, j, heightDatas[i, j]);
}
}
}

public void SetHeight(int i, int j, float height) {
if (i < 0 || i >= size || j < 0 || j >= size) {
Debug.LogError($"out of index, error index {i}, {j}, size is {size}");
return;
}
int idx = i * size + j;
if (idx >= heightDatas.Count) {
this.heightDatas.Add(height);
} else {
this.heightDatas[idx] = height;
}
}

因为这里的HeightDataModel继承了ScriptableObject,同时持久化成为了Unity资产,所以在执行了反序列化逻辑后可以在文件浏览器中看到生成的HeightDataModel实例:

自此我们已经建立起高度数据的组织形式,后面我们可以添加逻辑,将高度数据应用到地形实践上

2.应用高度图到地块

我们的Terrain地图依然是一片平地,现在需要将已经组织好的高度图应用到Terrain上。但目前却有以下的问题:
-首先,Terrain地块的尺寸和高度图尺寸不一定一致,考虑到后续要做不同LOD的Terrain地块,基本不可能一一对应,应该如何为每个vertex采样高度?
-其次,TerrainCluster对应不同的TIF文件,怎么让不同的TIF文件对应到每个地块,并且保证它们连续?

对于第一个问题,我们可以直接映射,获取到高度图尺寸与地形尺寸后,根据其宽高找到地形上的顶点在高度图上对应的数据

对于第二个问题,先前提到,因为我们使用真实地理数据,所以TerrainCluster对应的TIF高度图文件都是有经纬度标注的,这也许可以作为构建每个Cluster的次序的信息。如果你使用其他途径得到的高度图数据,可以手动为每个高度图添加次序。

    image    
图:UGUS上下载的TIF高度图均有指定格式:n{纬度}_e{经度}

了解上述的答案后,可以开始我们的工作了!

2.1.封装高度数据获取

为了管理组织高度图数据,我们可以专门封装一个类进行高度数据采样的处理。这个类需要知道地形的尺寸,也需要知道高度图的尺寸,同时还应该持有高度图数据的引用。当拥有地形尺寸与高度图尺寸后,我们就可以根据比例映射获取到地形上某个点应该设置的高度。

所以这个类的关键代码为:

1
2
3
4
5
6
7
8
9
public class HeightDataManager
{
List<HeightDataModel> heightDataModels;
int srcWidth;
int srcHeight;
Vector3Int terrainClusterSize;
int terrainClusterWidth;
int terrainClusterHeight;
}

每当我们为TerrainCluster上的一个点确定高度时,只需要知道这个点相对于Cluster左下角的点的距离,还有该点所在地块的经纬度即可(来确定用哪个HeightDataModel里的数据)。

1
2
3
4
5
6
7
8
9
10
11
12
13
14
15
16
17
18
19
20
21
22
23
24
25
26
27
28
29
30
public float SampleFromHeightData(int longitude, int latitude, Vector3 vertPos, Vector3 clusterStartPoint) {

HeightData heightData = HeightDataModel.GetHeightData(longitude, latitude);
if (heightData != null) {

// fixed the vert, because exist cluster offset!
vertPos.x -= clusterStartPoint.x;
vertPos.z -= clusterStartPoint.z;
// resample the size of height map
float sx = vertPos.x / terrainClusterWidth * srcWidth;
float sy = vertPos.z / terrainClusterHeight * srcHeight;

int x0 = Mathf.FloorToInt(sx); //Mathf.Clamp(, 0, srcWidth - 1);
int x1 = x0 + 1; // Mathf.Min(, srcWidth - 1);
int y0 = Mathf.FloorToInt(sy); // Mathf.Clamp(, 0, srcHeight - 1); ;
int y1 = y0 + 1; // Mathf.Min(, srcHeight - 1);
float q00 = GetHeightVal(longitude, latitude, x0, y0, heightData);
float q01 = GetHeightVal(longitude, latitude, x0, y1, heightData);
float q10 = GetHeightVal(longitude, latitude, x1, y0, heightData);
float q11 = GetHeightVal(longitude, latitude, x1, y1, heightData);

float rx0 = Mathf.Lerp(q00, q10, sx - x0);
float rx1 = Mathf.Lerp(q01, q11, sx - x0);

float h = Mathf.Lerp(rx0, rx1, sy - y0) * terrainClusterSize.y;
float fixed_h = Mathf.Clamp(h, 0, 50);
return fixed_h;
}
return 0;
}

如果直接执行上面的代码,在地形规模大的时候会卡住很久,这是因为我们需要遍历每个顶点为其采样高度,同时又要去每个HeightDataModel下去找该顶点的Cluster的经纬度对应的TIF,所以执行效率会很低。可以使用缓存来减少消耗时间,只需要根据时间局部性原理记录最近采样的TIF文件然后获取到这个字段即可,可直接见源码,此处不记

2.2.设置地块Mesh的高度

设置地形上每个vertex的y值,只需要在Tile的生成Mesh的代码中添加下面这行代码即可

1
2
3
4
5
……
Vector3 vert = new Vector3(gridSize * i, 0, gridSize * j) + startPoint - offsetInMeshVert;
float height = heightDataManager.SampleFromHeightData(longitude, latitude, vert, clusterStartPoint);
vert.y = height;
……

至于HeightDataModel,可以采用单例或者直接传入Tile那一层来进行调用,如果使用单例:

1
2
3
4
5
6
7
8
9
10
public class Singleton<T> where T : class, new() {
private static T instance;
public static T GetInstance() {
if (instance == null) {
instance = new T();
}
return instance;
}
public Singleton() { }
}

让HeightDataModel继承上面的类即可

2.3.初步的地貌样式

目前的地形还是一张平面图,是时候应用上我们之前构建的高度图数据了,让它有些高低起伏了。在执行完上面的结果之后会看到以下的地形白膜:

    image    
图:地形白膜

上面的地形中并未做任何着色操作,使用默认材质。同时因为我们生成了法线,所以也可以见到阴影。为了让目前的地形更好看些,可以使用Shader进行些美化。

首先,在生成地形Mesh的时候,根据遍历到的每个顶点的y值(高度),决定该顶点的颜色,最后在shader中应用该颜色。

1
2
3
4
5
6
7
8
9
10
11
12
private Color GetColorByHeight(float height) {
if (height < 10f)
return lowLandColor; // 低地
else if (height < 15f)
return midLandColor; // 中地
else if (height < 23f)
return highLandColor; // 高地
else if (height < 30f)
return mountainColor; // 山地
else
return snowColor; // 雪地
}

对应的Shader代码(因为直接采用顶点颜色为其着色,所以很简单):

1
2
3
4
5
6
7
8
9
10
11
12
13
14
15
16
17
18
19
20
21
22
23
24
25
SubShader
{
Tags { "RenderType"="Opaque" }

CGPROGRAM
#pragma surface surf Lambert

struct Input
{
float2 uv_MainTex;
float3 worldPos;
float3 barycentric; // 添加重心坐标信息
float4 color0 : COLOR; // 顶点颜色信息
};

void surf (Input IN, inout SurfaceOutput o)
{
float3 vertexColor = IN.barycentric.x * IN.color0.rgb +
IN.barycentric.y * IN.color0.rgb +
IN.barycentric.z * IN.color0.rgb;

o.Albedo = vertexColor;
}
ENDCG
}

Shader可以生成材质,再通过代码或者直接到MeshRender那里挂接从而生成最终的地形。

本篇日志是最基础的地形搭建,在完成了上述的操作后,使用之前生成的高度图数据,就可以在Editor中生成地形,看到以下有基本地貌的地形,这也就意味着我们迈出了重要的第一步了!

    image    
图:有基本地貌的地形